Friday, November 2, 2012

I love it when a plan comes together

Well, we are quickly preparing for the renovation of the tub and shower in the main bathroom.  I am scurrying around and gathering up the needed supplies.
The grout has cracked around the tub and there has been water infiltration behind the tile so we need to change the tile out.  The quickest and cheapest solution is to install a tub surround.  Karalee wants a taller tub, so now is the time to change that out.  The faucet system is the old two handle system and with the younger children we want to change that to the pressure balanced one handle faucet. 
I have never changed or installed a tub before so this will be a learning experience, I have participated in installing a tub surround before. 
Along with the tub surround change we will need to retile the floor, paint the new drywall and install the new toilet that we have had since we moved in. 
We will be taking pictures and posting them up after the work is complete.  It is going to be a busy weekend. 

Wednesday, June 20, 2012

Brakes and Rotors

My wife's PT cruiser has needed the brakes done so it has been on the list.  They have been scraping when she applied the brake, so it is time to change them.  My neighbor was kind enough to allow me to once again use his garage to perform the maintenance and show me how to do it.  This trip into the garage is only the front brakes, the rear ones will require a second trip in as there is only so much time in the evening to get the work done.

This was a fairly straight forward process.  We jacked up the front of the car and chalked the rear wheels.  We took the front wheels off.  On the brake caliper there is a bolt to hold the caliper to the wheel hub.  We undid that bolt and pulled the calliper off of the rotor.  You don't want the caliper to hang by the brake hose if you are going to put it down so we tied them up.  Also, sometimes you need to spend some time working on the rotor to get it off, so you need it up out of the way.  Luckily for us the calipers just slid off.  I popped the pads out of the caliper.  They were pretty low, almost down to the metal.  Because we had added brake fluid a few weeks ago we needed to get a clamp on the caliper piston to bring it back so that we could insert the new pads.  The side closes to the piston is the side that had the metal tab on the side of the caliper.  With the extra fluid in the reservoir when we compressed both calipers we had some overflow from the reservoir.  Once the pads were in, we just reversed the process to get everything back to normal. 

I hear there may be some surprises with the rear rotors, but we will have to find out.  Also, my Pathfinder will need new pads this fall, but I hear the rotors are difficult to get off in a Pathfinder, so I need to leave some extra time for that job.

Anyways, after changing pads this is something that most people should be at least aware of how to do, and do it once.  Please leave some of your tricks for doing brake work down in the comments section.

Friday, June 15, 2012

Hot tub sensor swap

As I mentioned on the May Long weekend post I had to change the sensors on the hot tub.  I wanted to break this post out just so that people can find it in the future for those that are interested. I have a Polar Spa hot tub that is over 6 years old.  The name plate is wore a little and the model and dates are no longer present.  It is controlled by a Balboa M-series controller.

On the Friday of the May long weekend I opened up the hot tub to see a sensor error (code Sn).  This means that there is an error between the Sensor A (the inflow sensor) and Sensor B (the outflow sensor).  I called my hot tub guy up to find out what I could do about this.  Kyle over at J&J Service Tech in Calgary is a fantastic guy and answers my questions whenever I have them.  Kyle told me to shut the power off for 30mins to see if it would reset.  After the alotted time was over I turned the power back on and I got a Sensor B error (code Sb).  This code states that there is a malfunction with that sensor.  With another quick chat with Kyle and I found out that he did not have any sensors left as it is a busy time of year for getting hot tubs operational.  He suggested a few places that I try that I might find them.  He told me the part that I was looking for was the M7 Sensor.

Armed with my knowledge I set out to find the sensors.  After a quick google search and some waiting for stock checks I found some.  I figured if I was going to change one I might as well change both.  I drained the hot tub to below the heating tube.  You do not need to completely drain the hot tub, just make sure the water line is below where you are working.  I pulled the cover off of the controller and traced the lines from the sensors to their connection points on the board.  The circuit diagram is printed on the inside of the controller cover, and I always double check what I am working on is what the diagram says it is. 

Here are where the two sensors are located at.


Change the sensors was easy, just unthread and unplug them .  Then thread in the new one and plug it in the correct spot on the board.  I tucked the wires out of the way and put the cover back on.  I refilled it and turned the power back on.  It takes a minute for it to initialize then it indicated that it was operating correctly.

If you have any comments or questions please share below. You can also follow me on twitter at https://twitter.com/@bjshideler

Propane Regulator

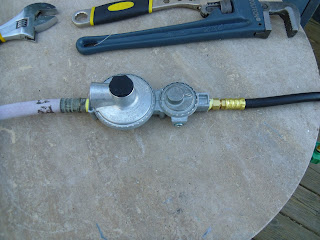
Now is the time of year where I start to do some trailer work.  When I have posted on my blog before about about work that I have done on my trailer, it has been popular.  I felt that I was not getting enough flow out of my propane system, especially on the propane light and knowing that the previous owner never used the propane system I figured that something was plugged in the system.  After a quick search on the Internet most people blame the regulator.  It is very possible that the regulator was clogged or damaged as I am sure that it had travelled a few miles without being plugged into a tank, and then being stored that way too, not to mention that the trailer is from the 70's so it is probably getting near the end of its useful life.  I decided that I would replace the regulator, and while I was at it upgrade the end of the hose to the new style so that I did not need to bring a crescent wrench down to the trailer when I wanted to change propane tanks. 

I know very little about gas fitting, other than standard plumbing rules.  I know that they use a different type of Teflon tape than with water.  The first thing I did was remove the old regulator to make sure that I got the right one from the store.  You could remove the nozzle too, but I wanted to change the style and I was not sure of the condition it either.  You cannot see it here, but the O-ring is pretty rough.


I put the old hose that connects to the steel lines on the new regulator.  Here you can also the new nozzle hose and some of the tools I used to get things apart and back together.  I would recommend a bench vise if you have access to one.


I taped all of the connections and made sure that they were very tight.  I reconnected the flex line to the steel lines.  Even though they are rusty they appear to be fairly strong and intact.


Once everything was connected I cracked open the propane tank and checked all of my connections for leaks.  I did not detect any leaks.  It was time for phase 2 of the testing.


I went inside and ran the propane on the stove, and I think the flow is better as I did not do a control test before I removed the regulator to see the flow.  When we bought the trailer there was an old propane light fixture, but the globe was damaged and I did not know what kind of mantle would go onto the light.  So I removed the light fixture and put a brass nipple and elbow and then a Primus fitting (the male fitting on a disposable propane bottle, or 1" x 20 TPI Male fitting) so that I could screw my camp light onto it.  When I put the light on I get a little bit of propane out of the light but there is still not enough flow to the light for it to burn.  I am going to have to experiment a little to find out what is regulating the flow down so that there is not enough propane.  


If you have any thoughts on this or your own propane stories, please share in the comments section.


Tuesday, June 12, 2012

Oil Change

From everyone that I have ever talked to about car maintenance an oil change is by far voted the most important thing to do.  Oil is very crucial to the operation of the engine, it lubricates the parts, helps transfer the heat from the pistons out to the block and the coolant system, maintains a pressure in the system, and helps flush out any grunge that develops from the combustion cycle.  This is the primary reason why the oil filter and oil is changed, also because of the extreme temperatures the oil breaks down and it will not be able to maintain the engine pressure.  You may notice that towards the end of the oil life cycle when you start up your vehicle the low pressure light stays on for a little bit longer than it normally does, this is why.  There is a lot of debate on whether to use regular oil or synthetic oil.  Sure, synthetic oil is really good for you engine, but if you cannot afford it then regular oil will be fine.  It is more important to change your oil frequently.  The maximum distance should be the one recommended in your owners manual.  They same debate occurs with brand of oil filters, the answer is the same, it does not matter.  Oil changes are very easy to do, and the lube shops charge way to much for what they do.  Instead of synthetic oil I use a Lucas Oil additive to replace a litre of oil for it.  This a fantastic product that I believe works to help both old and new engines.

Due to my recent work on the PT cruiser I was a little leery about changing the oil on it as I was afraid that the filter was hidden is some dark crevice of the engine compartment.  After I got the car up on the ramps and crawled underneath I was pleasantly surprised that the oil filter was easy to reach and that the drain plug was right beside it and easy to reach.  I have been changing the oil in cars for a lot of years, but it has been a few years due to the lack of a location and the time to change the oil.  With both vehicles to do now it makes more sense economically.

I also changed the oil in my 2001 PT Cruiser.  The lube shops charge an extra $10 for the privilege of removing the bottom skid plate (shroud).  There was 4 bolts (a few have been lost), it is ridiculous that they charge for that.  Once I got the plate of it took me a moment to locate the drain plug as it was not located exactly on the bottom of the engine like most other engines.  It looks like a little remote drain plug location, which makes it really to drain the oil.  I think more vehicles should have it, especially now that I know what it is.

For those that haven't changed oil before here is the quick rundown of how I do it.

1.) Put the car on ramps and engage the parking break.
2.) Open the hood up and remove the oil filler cap.
3.) Put a drain pan underneath the drain plug and remove the drain plug.
4.) Remove the oil filter and drain into drain pan (may need a wrench).
5.) Put a little oil on the gasket ring of the new oil filter.  The used oil is fine.
6.) Install new oil filter.  Turn the oil filter 1/3 turn past the contact point.
7.) Reinstall the oil plug.
8.) Add oil (amount is in owner's manual).
9.) Reinstall the oil fill cap.
10.) Start car and check for leaks.

Here is a good reference from Amsoil that you can look up the fluid capacities needed.

This is the procedure that I learned when I was 13 and I have been doing it ever since.  Share some of your oil change stories in the comments below.


Monday, June 11, 2012

May Long Weekend

In multiple countries there is a long weekend towards the end of May.  Here in Canada it is Victoria Day to celebrate the Queen's Birthday.  This weekend is often heralded as the start of the summer season, with many that go camping or do chores around the house.  As the campgrounds tend to be a zoo and the possibility for snow is high in Alberta for that weekend we decide to stay home.  I had a very ambitious list of items to complete.

In the fall I did not have time to complete the grounding installation for the HF vertical that sits on top of my house.  There had already been one thunderstorm and another was in the forecast I figured it was time to get that item complete.  This was a simple installation I installed a ground pipe clamp to the bottom of the antenna below the counterpoise so that the grounding did not interact with the antenna.  I used #6 copper wire down to the ground where I had a ground plate waiting in hole that I had dug.  On my coax from the antenna I have a lightning protection on that too, so I ran a copper wire from that to the ground plate.  With everything connected I buried the plate back into the ground.  This should be sufficient for my set up.

We had some friends over for a BBQ, a fire and to sit in the hot tub.  In anticipation for the weekend I got the hot tub started on Wednesday and all had started out well.  On Friday evening I opened up the hot tub to see how things were going and I had a sensor error.  Our hot tub is a few years old and we replaced the sensors last year, so I was surprised to see the error.  I will comment more directly on how I fixed this on a future post.

I had recently acquired a dual fuel (propane/charcoal) BBQ grill.  I have never cooked with charcoal, so I want to develop that skill, so we had our inaugural cook of with that.  I learned a lot about placement of coals.  I had over cooked the meat this time, but I will do better next time.

We were running out of steam on Monday, but we got the lawn mowed and the garden bed prepared for seeds.

What did  you get up to over the May Long weekend?  Share your story below with everyone.

Tuesday, May 1, 2012

Working on the PT Cruiser

Well, a few weeks ago we picked up a 2001 PT cruiser from the auction.  I did not follow all of my auction rules as close as I usually do and I got bit a little on it.  There was some major work that we missed.  So with the typical minor work we figured we would do it ourselves. 

First up the battery was kind of weak. After removing it we discovered it was bulging on the sides, which is a good indicator that the plates are not where they are supposed to be.  To replace the battery is a little bit of struggle and an exercise in 3D tetris.  From looking at the air filter the battery is right in front of the air box under the air intake ducting.  On other vehicles that I have worked on the battery is held in with a strap that goes over top of the battery, well not in this instance.  For the life of me I could not figure out how to get this out on my own.  Well a quick trip in to the computer and a view on YouTube I discovered that you had to pull out the air box with a good yank to get at the anchor for the battery.  After this it was smooth sailing to get the battery replaced.

Next up was the rear brake light.  That was simple, just a torx screw and the light assembly comes out.  Just twist out the bulb and replace.  This was a 3157 bulb.

Now to the front driver side signal light.  Learning from my previous experience I did a quick search on YouTube to see how to change the bulb.  To access the bulb, one needs to turn the wheel in and from the wheel well there is an access hatch in the molding of the wheel well housing that needs to be pryed open to gain access to the rear of the front light assembly.  After some cajoling I gained access to the lights and it was a simple twist and change of the 3157NA bulb.

So the moral of the story to me is that if I am to do work on the PT cruiser is to either YouTube search my query before I start the work so that I can be prepared for what I need to do before I begin the job. 

Share in the comments section some of your questions or insights on working on a PT Cruiser. 

If you like what you have read, please subscribe to the blog, or follow me on twitter at @bjshideler. Also, share this post with your friends on your favorite social media sites.

An End to the April A to Z blogging challenge

Well, the month of April is over and so is the April A to Z blogging challenge.  It has been a whirlwind and I did not know if I was going to be able to keep up with daily posts and the busy demands of my young family.  I was able to get all the posts out on their appropriate day, though some were at the eleventh hour.  The biggest part of my success was that I was able to prepare with topics before the month.  I came up with all of the topics prior to the month  This helped when I sat down at the computer to write the post I already had a topic to write on.  I now have more posts in the month of April than in my previous months worth of work.  I did not necessarily cover just projects I was working on, but kept to the theme of my blog of DIY projects.

I am very grateful to all the people that came and read my posts.  I have had over 500 pageviews in the last month, which is not a lot by the big wigs standards, but it is pretty good for me where I may get at the most 50 pageviews in a month.  I am also grateful to those that left comments as I have emphasized a few times in the last month that community is the most important thing along with the discussion that ensues from that community.

I was only able to read a few of the blogs that were involved in the challenge, which if I were to participate again next year, I would endeavor to get out into that community and have some discussions.  Also, because I was pressed for time I never proof read any of my posts prior to getting them out.  I took the approach that quantity was the name of the game over quality, so the quality may have suffered a little.  Next time I would like to have a graphic for every post as it helps it stand out when I post to my social media outlets. 

Thanks again for all that have stopped by, especially those that subscribed or left comments. Leave some comments on your experience from the month of April A to Z blogging challenge.


If you like what you have read, please subscribe to the blog, or follow me on twitter at @bjshideler. Also, share this post with your friends on your favorite social media sites.

Monday, April 30, 2012

Z is for Zero


Z is for Zero

In discussion with some colleagues at work on today’s topic on zero they said that I should have a bit where the limit of the function tends to zero.  Being that I generally do not discuss calculus on the blog generally and that limits are not my favourite thing to talk about I will defer that topic for the time being.

A zero is an important concept in building something. It is also known as a datum.  This is the point in which to measure everything off of, and therefore all cuts and work are from it.  I typically have two types of measurement errors, the first is where I just make a mistake and the second is where I take a measurement off of another cut without double checking to make sure the measurement chain works out.  Sometimes it is as simple as I did not account for the width of the blade in the cut.  Other times I was just not careful in the math to work out the chain.

On lumber typically the most accurate sides to take measurements off of are mill cuts or the factory cuts.  They are usually identified either with some paint or they have writing on them.  You know that the cuts are parallel and perpendicular to the work so that your other cuts have a chance at being so too. 

When machining you will take your metal stock and make a zero by facing off the stock so that it is also flat, parallel and perpendicular to the work surface.  From this surface all of the measurements are worked off from there. 

I have made these mistakes on my personal projects and whenever I get a drawing that has a dimension that comes from nowhere I tend to ask a lot of questions about it, or try to work through the measurement chain to see if the measurement is correct.

Please share some of your measurement adventures in the comments section below.  

If you like what you have read, please subscribe to the blog, or follow me on twitter at @bjshideler. Also, share this post with your friends on your favorite social media sites.

Saturday, April 28, 2012

Y is for Yardwork


Y is for Yardwork

I have done a bit of yardwork during my growing up years.  I was mostly responsible for cutting the grass.  During a number of years we lived on a farm that had a lot of grass.  We had a ride-on lawn mower at it took me at least 3 hours to mow the grass every week.  From this I have developed a strong dislike for lawn mowing.  At our place here in the city we have a very small patch of grass and I have a rotary push mower and I can mow the lawn in about 20 minutes.

I would like to reduce the work on my lawn even further my getting a movable rabbit pen and grazing meat rabbits on my lawn.  My wife is currently against the idea, but I think there are a lot of benefits to this.  The first being obvious is that I do not have to mow any more, the second is that it is fertilized, the third is that it the grass is stimulated to grow my natural methods. 

We take a similar approach to what few garden beds we have.  If I am going to put in plants into those beds then I need to be able to harvest some produce from them.  One of the easiest things to grow is herbs, and fresh herbs are so good in food that I am a big fan, they also bring in beneficial insects that will either pollinate my other plants or insects that will eat the insects that want to harm my other plants.

One of the common complaints that I have heard about the region of Calgary Alberta is that the season is too short and that you cannot grow anything here.  While it is true that we are in a Zone 3 area the biggest problem that I have encountered is the soil.  The beds at our house are dead.  There is no organic matter or life in them at all.  Soil needs to be living, but through constant turning and addition of both fertilizers and herbicides we have managed to kill the soil.  I am endeavouring to bring my soil back to life, so that it can sustain me.

Share some of your insights into yardwork and gardening in the comments below.

If you like what you have read, please subscribe to the blog, or follow me on twitter at @bjshideler. Also, share this post with your friends on your favorite social media sites.

Friday, April 27, 2012

X is for XYZ Co-ordinates


X is for XYZ Co-ordinates

Today’s topic is in reference to modelling drawings in different software.  To the previous generation this is typically referred to as drafting, but with the advent of current computer software these are 3D models that we are creating.  I am familiar with SolidWorks as that is the software that I was trained on at school.  It is really good software to use, but it is not cheap either.  For the amateur just wanting to put together a quick 3D model, then Google SketchUp is probably a fine for your needs.  I am looking at FreeCAD which is open source software as an alternative to the expensive software.

All of the different software suites have use a XYZ system and different planes to work one.  To the uninitiated that has not used the software much and start designing right away it is easy to neglect which way is up, but with my experience when you go back to edit the model or assemble the different parts together, if you were not careful then things can go awry and cause lots of work later trying to fix things that went haywire.

More recently in my industry in commercial construction there is a shift away (albeit slow) from drafting though digital to modelling through software know as BIM.  BIM, Building Information Modelling allows for a building to be designed and prototyped similar to how vehicles have been prototyped on the computer prior to construction.  In the auto industry this has allowed new vehicles to reach the market much sooner.  These kinds of advances are what are hoped for in the construction industry.  Being coupled with a new contract and management paradigm these efficiencies should be able to be realized. 

Share some of your stories drafting or modelling down in the comments section.

If you like what you have read, please subscribe to the blog, or follow me on twitter at @bjshideler. Also, share this post with your friends on your favorite social media sites.

Wednesday, April 25, 2012

W is for Waste Removal


W is for Waste Removal

As with any project there is always waste that is created.  Typically there is some packaging that will come with the material or tools purchased for the project.  The other option is generated from cutting operations, like saw dust, metal filings, or wire casing. 

On a small project I typically just clean up at the end of the job, but the bigger the job gets the more planning of cleaning or dealing with waste as you go needs to occur.  This could include setting the saw up in a place that is not in the flow of traffic that saw dust can accumulate or having a waste bin nearby so that packaging can get disposed of right away.  I just purchased a new BBQ and I had Abbi, my daughter, putting all the packaging into a garbage bag as we were on the deck outside and I did not want it to be blowing all over the place.

Another thing to think about is that having a clean site promotes safety.  You can find your tools and you will less likely trip over stuff and get hurt.

Share some of your thoughts down in the comments section.

If you like what you have read, please subscribe to the blog, or follow me on twitter at @bjshideler. Also, share this post with your friends on your favorite social media sites.


V is for Vehicle Maintenance


V is for Vehicle Maintenance

When I was about 13 years old my Dad said to me that because I was going to be driving soon, I needed to learn how to change the oil on the vehicles.  In Alberta Canada you can begin driving with a fully licensed driver as a learner when you are 14 years old.  At this point in time we only had 3 vehicles.  Dad had his truck, mom had hers and there was the farm truck.  This began my work on vehicle maintenance.  During the peak of my teen years there were 7 vehicles at the house for my sister, myself and my parents.  I had plenty of opportunity to work on them.  We did not have a fully equipped garage, but we had basic tools so we did basic work.  There was plenty of opportunity to change oil and other filters.  After high school I worked out of town and commuted at least 130km per day so I was changing oil every 5-6 weeks (5000km) and I got really fast at it too.  My friend was over one day and he had worked in lube shop and he was impressed at how quick I was able to change the oil in my car (less than 20 minutes). 

During high school I worked at both Home Hardware and NAPA Auto Parts and I learned that with older cars vehicle maintenance it is very important to do regular oil changes.  It is probably the single most important thing to do.  I found a number of additives that helped out with the performance of my car.  We sold and recommended the Lucas Oil line of products; they are what I use even to this day.  I put the fuel additive into my vehicle the other day and I got a 12% gain in fuel efficiency. 

We have just purchased an older vehicle for my wife (2001 PT Cruiser) and it has some basic work that needs to be done.  I am thankful that I am able and knowledgeable to perform that work rather than pay someone $120/hr to do it.  So soon we will change out some signal lights, change the oil, change the battery, and change the air filter and some other work.  When we get to that work I will take some photos and post on that process.

Share with group some of the maintenance that you do on your vehicles.

If you like what you have read, please subscribe to the blog, or follow me on twitter at @bjshideler. Also, share this post with your friends on your favorite social media sites.

Tuesday, April 24, 2012

U is for Unknown Variable

U is for Unknown Variable


With any project there is always an element of risk or unknown, especially if you have never done it before.  Quite frequently this for me is the planning of how long it will take.  Almost always something unexpected comes up and I need to spend some time scratching my head trying to figure out how to make something work.  I tend to do some planning before I begin the job figuring out how much material and what tools I will need to do the work.  On bigger projects I do some risk analysis to determine where the likelihood of something going wrong is and then try to minimize it where I can.  Due to a lot of inexperience in things other than cabinet making I am not usually successful in finding those things that go awry before they do.  For this reason I really prefer working with new components that I am installing rather than making old things work or to modify old things.  I do not have the time allotted for that kind of work or the tools to make the old things work well. 


For example, I recently changed the supply line on the dishwasher as it had developed a pinhole leak.  In my mind this is a simple fix as I just go to Rona and pick up a new one and connect it in place of the previous one.  Well, when I closed the isolation valve and took the hose off, the valve was also leaking.  It was a soldered on valve, but I cut that off and began directly from the copper piping.  I did not want to use a solder on valve as it was in under the cupboard, so I tried a compression fit valve for the first time and it worked very well. When I connected to the dishwasher there was a very small drip that I could not determine if it was coming from just above the connection I had just made or through the threads of my new joint.  I doubt it is my joint, as I have lots of Teflon tape on those threads.  What was supposed to be a quick and simple fix had several unknown variables come up during the project.

Share some of your stories about some unknown variables that have come up during projects you have worked on.. 
If you like what you have read, please subscribe to the blog, or follow me on twitter at @bjshideler. Also, share this post with your friends on your favorite social media sites.

Monday, April 23, 2012

T is for Tools

T is for Tools

Any time I begin a new project I like to go and get a new tool for it, which frustrates my wife to no end.  She does not like to spend money on things and she sees tools as a sunk cost with no added value to the project.  This is further aggravated if she does not really approve of the project in the first place. 

I however see tools as a good investment, by having tools I can perform more functions in the future if the need ever arises.  They also allow me to work faster and safer.  I have mentioned on previous posts of how this is the case.  For example on my post about my lawn mower that I was sharpening last year, I wasted a lot of time trying to get the snap ring off as well as I also almost puncture my hand several times with normal pliers before I got the proper tool. If you use the wrong tool for the job, there is a high likelihood that you will damage that tool by using it improperly. 

When I go and select a tool to buy I usually approach it from one of two perspectives.  Either I want that tool for repeated use and for a number of years or I have a one off tool for a specialty task that I do not perform very often.  For the first case I will spend the money and get a quality tool, now I do think you get what you pay for to a point.  I don't think the most expensive tool is necessarily better than one just above the middle of the pack.  If it is a one off tool then I will tend to get the cheapest tool to finish the job.

Share some of your stories about your tools below in the comments.

If you like what you have read, please subscribe to the blog, or follow me on twitter at @bjshideler. Also, share this post with your friends on your favorite social media sites.

Saturday, April 21, 2012

S is for Solder vs Crimp


S is for Solder vs Crimp

In the amateur radio world there is a great debate over which is better to solder or to crimp, this goes into coaxial cable as well.  For the old timers they like the strength of solder in that there is a fused connection between the two pieces of wire or the connector.  This connection will provide the electrical continuity that is being looked for.  The downside to these connections is that with the hard connection that repetitive motion of the wire at the joint could also make the joint break at that location over time.  Another weakness of solder is that if there is enough heat either due to resistance (too much current) it will melt the solder and you will lose the connection.

The alternative to soldering is crimping.  Crimping provides a connection that relies on friction to keep it together.  Crimping is really easy and quick, also it is a lot more portable than trying to take a soldering iron to wherever you want to make a connection.  For example I was on the roof last fall installing an antenna and I needed to put an end on it.  It would have been very awkward to pull up the extension cord and my soldering iron up there and waited for it to heat up and shield it from the wind as it is only a cheap 30W iron and hope that it would have worked.  Instead I pulled out my crimpers and made the connection in less than a minute.  People are afraid that if you got water in the connection it would cause it to corrode and not be as electrically sound or that it will pull out no longer being connected.  To alleviate the corrosion issue you can put some dielectric grease which is used in car spark plug wires to make sure it makes the connection.  By covering the joint in grease it will keep the water out of there.  The best way that I have found to make sure that you get a good connection is to have a set of purpose built crimpers, not the all in ones from Radio Shack.  I have found some pairs for a really good price and then make sure that the crimp is on all sides and that there is not a place for the wire to wiggle out of. 

From my experience at work in both high and low voltage there is no soldering, neither in automotive, I am also told that it is forbidden in the aviation world.  NASA will use solder in their lineman’s splice which because of the single use nature of a mission build there is not a lot of repetitive strain loading on the wires for it to fatigue.  Now back when the linesman would use that splice on telegraph wire they did not use solder.  The only place I have come across solder is in electronics, which is too small for crimping.

Anyways, there is some background on the age old debate.  Share with the group whether you prefer to crimp or solder. 

If you like what you have read, please subscribe to the blog, or follow me on twitter at @bjshideler. Also, share this post with your friends on your favorite social media sites.

Friday, April 20, 2012

R is for Renaissance Man

R is for Renaissance Man

I came across the term Renaissance Man a little while ago and I really like the term.  It means a person who has expertise in many fields spanning a wide range of topics.  There are a number of scientists and artists that are considered Renaissance men people like Leonardo da Vinci, Galileo, Michelangelo, Newton, Ben Franklin, and Thomas Jefferson. Now these men had to out of necessity become proficient in multiple fields so that they could progress their work forward as no singular discipline is isolated from another.  The term was popularized during the Renaissance period where it was socially expected to be well rounded in both the arts and sciences. 

Jack of all trades is a term that is similar in meaning but slightly different.  It is a step down the Renaissance man in that he may not have an expertise in the many fields, but be skilled or competent in many trade or practical fields versus in academics.  I tend to find myself between the two worlds.  As one that likes to work on projects of various natures and disciplines I find myself gaining competency in many areas.  I also have diverse academic interests.  I think striving to become a Renaissance man is a worthwhile goal, but I do not think that you can call yourself one, it is one of those titles that is best to be bestowed upon you by others. 

I find that there is a trend for people to be specialists rather than have a broad skill set.  It does make sense for some people to become very specialized and focus their talents upon one specific skill set, but for the majority of people out there in my opinion specialize on areas that limit their abilities if that skill set becomes obsolete.  Also, I find it limits people when the find themselves in diverse social settings as they have limited range of topics in which to discuss with people.  I am sure we have all been at a social gathering talking with someone and they are all into one particular topic (ie cars) and though I may know something on that topic I do not want to talk about it the whole time I am at that event unless that is what the event is about.  But after I get to the end of knowing all that I want to know about it I desperately want to move onto someone else so that I can change topics.

Share some of your thoughts on this topic.  Maybe share some stories of how you have been trapped by someone that just wants to discuss one topic or share a topic that you would like to know more about that is totally different than you currently do.

If you like what you have read, please subscribe to the blog, or follow me on twitter at @bjshideler. Also, share this post with your friends on your favorite social media sites.

Thursday, April 19, 2012

Q is for Quantity Take-off

Q is for Quantity Take-off

A quantity take-off is a term used in construction to mean that someone figures out how much material that they need for a piece of work.  Usually that means using the drawings to come up with dimensions.  I have done a lot of scaling, which is warned against on the drawings mostly to protect designers against missing something on their drawing.  In Canada commercial building drawings are typically in millimetres and the scale is usually between 1:100 and 1:200 at least on the buildings I deal with.  I have a ruler (a scale) and measure the various elements on the drawings to get what I need. 

At work I typically am figuring out how much concrete I need.  Concrete take-offs are really easy.  It is length x width x height.  You neglect the rebar as they don’t take up much room.  If the area that you want to pour is not square you just make your best guess on square as at the end of the day you will round up.  It is better to have a little too much than not enough. 

When I am working on a project at home I like to draw it out to visualize the project and to put some dimensions on the piece.  Then I take the pieces and put it on a sheet of plywood or dimensional lumber, this then gives me the counts of how much material that I need to pick up.  This goes for material other than wood, but I do not have as much experience with those as well.

If there are a lot of components, especially repeated components then I like to build an Excel sheet that will do the math for me, just so that I do not make a mistake. I do this at work frequently, especially because then I will need to issue a purchase order and that sheet will show my work and justification for the purchase.

Share in the comments how you figure out how much material you need for a project.  If you like what you have read, please subscribe to the blog, or follow me on twitter at @bjshideler. Also, share this post with your friends on your favorite social media sites.

Wednesday, April 18, 2012

P is for Podcasts, Blogs and Forums

P is for Podcasts, Blogs and Forums

I have recently become addicted to podcasts, and blogs, but I haven’t got much from forums yet.  This is mostly in my estimation due to the fact that they are fairly passive forms of information gathering rather than participating in the creation of ideas in a forum.  There are a few forums that I am apart of though, just not that active in them.

When I was a kid, my Dad would get the newspaper everyday and read it, and then in the evening he would watch the news usually The National on CBC at 10pm followed by one of the other local networks for the “local” news.  He still does this to this day, and the local news is the closest city to him about 150km as he lives in rural Alberta.  For me I get very bored with traditional media news.  The closest I get to a newscast is on the radio while I am driving somewhere, but this is limited as I am usually listening to a podcast or talking on my mobile amateur radio rig on the local repeater. 

I started listening to podcasts a few years ago as my interest in emergency preparedness grew and I was searching on the internet for information.  This was in close connection with my work on getting my Amateur Radio license and emergency communications.  I started listening to Jack Spirko over at The Survival Podcast.  He does a daily one hour podcast on preparedness and modern survival with a very broad range of topics.  At the time I started I was listening on my computer, but the sound of Jack’s voice irritated my wife after a while, so when I began working full time after I finished school I was issued a Blackberry which I installed the podcast app onto.  During this time I would listen to a podcast as I commuted to and from work.  Jack is very good and enthusiastic and I agree with a lot of his points of view, but I was concerned that I was only getting one point of view, so I sought out some alternatives just to broaden my own horizons and make sure that I had multiple perspectives.  At the time I did not find too many, but after I got a new personal phone I downloaded the Listen app by Google and have added 13 podcasts to that list.  Now for the most part these podcasters produce 1 episode a week some less so I can usually keep up with demand. 

During my last year of university we had Ben Eadie come into our design class and lecture on social media and blogging.  He is a local guy that has had a lot of success with this format of being a guru and getting his message out there.  He encouraged us to start a blog on what we were passionate about and had some knowledge on to establish ourselves as experts in that field.  The rationale behind that is if we are experts then people will seek us out for more information and people will offer us work.  Ben is the reason that I started this blog.  I never really read a lot of blogs until I used the blogger dashboard and then I would subscribe to a few blogs and that was good, it helped aggregate the feeds for me, but I was under the impression the dashboard only worked for blogger websites.  With the acquisition of my android phone I was introduced to the Google Reader app and from there my number of subscriptions has skyrocketed.  My feed was getting a little overwhelmed so I trimmed a few that do the short little one line spam posts, also if they were abandoned feeds they were gone too .  If I was not getting value from their work I kicked them to the curb.  So for me when I am eating breakfast in the morning I grab my tablet and read some of the content that I have found value in and partake in that.  I am the editor of what I receive. 

Here is a quick note on forums.  There is a lot of information out there in forums as I have mentioned before.  Anytime I am searching for some information on how to do something I usually end up either on YouTube or I end up in a forum.  Building community is important and that is typically done in the forums for the places that interest you.  One of the things you can do if you do not find a forum that suits what you are looking for is that you can start one of your own. 

Anyways, that is how I use Podcasts, Blogs and Forums.  Please share in the comments how you use these wonderful resources. If you like what you have read, please subscribe to the blog, or follow me on twitter at @bjshideler. Also, share this post with your friends on your favorite social media sites.

Monday, April 16, 2012

O is for Open Source


O is for Open Source

Open source is a wave that has been growing in the software community for a number of years.  This goes back to a little to the Crowdsourcing post I did on day C.  The way the system works is that software is written, but the code is released to the public and shared on the internet.  For the uninitiated the code is what programmers write and then they run it through a program called a compiler so that the computer understands it and then it is a program that you can run on your computer (well that is a very simplistic look at it).  Historically, companies did not want to release their code out to the public as that would in their mind ruin their competitive advantage of having really good and novel programs. 

To my understanding Apple would not let their compilers out, which gave them the advantage that all of the software that was written for Apple machines had to be written by them, so that they could optimize it for their specific hardware configurations and ensure the stability of their operating system.  Microsoft came along and although did not let people see their code of how DOS or Windows, they did allow people to compile their own programs to run on their operating system.  This allowed for a lot more titles to be released for use on the Microsoft platform.  It was the late 1990’s that Apple signed a deal with Microsoft that paved the way for all software to be usable on both operating systems. 

You may be asking why I am giving a lesson on operating systems well because along came a third system called Linux.  Now Linux is completely open, if you do not like how something is put together or works on a Linux machine you are completely able to go and re-write something to your satisfaction.  Many people have and that is why if you were to look at the Linux world there is many different flavours of Linux for whatever you are looking for.  Linux is generally very stable and is the backbone to most servers on the internet. 

Well this also extends beyond operating systems to other software as well.  There is also a movement to extend this into hardware design, known as Open Hardware.  To protect the intellectual property that people publish to the world, it is published with a GNU license that states that it cannot be used for commercial purposes. 

How do you monetize your efforts with open source products you may be asking?  Well, the biggest way is that people will sell service to people and businesses that need it.  So if you use the software and you cannot figure it out from the documentation or you want a high level of service from the producer, then you pay for that from them.  This is generally how the industry works with that. 

Anyways it is late, so comment away on open source systems that you use.  If you like what you have read, please subscribe to the blog, or follow me on twitter at @bjshideler. Also, don't be afraid to share this with your friends on your favorite social media sites.

Sunday, April 15, 2012

N is for Ni-Cad


N is for Ni-Cad

I did a review back on April 2 on my Black & Decker cordless tool kit that I have.  The rechargeable batteries that come with the pack are Ni-Cad batteries.  Ni-Cad is short for Nickel-Cadmium batteries. 

For those that may have fallen asleep during science class on what a battery is here is a brief overview of batteries.  A battery works because there is an electrical difference between the two metals that are found in the cell.  This is a chemical difference and the two metals in a Ni-Cad battery are Nickel and Cadmium.  Batteries are useful because you can store that charge in them for time period.  When you use a battery that difference goes down and when you charge it you increase that difference again.

There are some problems that with Ni-Cad batters are that they don’t last very long, they can develop a memory and the charge will deplete over time.  On my B&D tools I can use the drill for quite a while on simple screws, but if I am putting in long screws into hard material it really uses up the battery power.  It also doesn’t have enough reserve to run the circular saw.  A battery memory is where when you over charge the batter some of the crystals in the battery join together, so there becomes less surface area for the charge to go to.  When you charge the battery it will not take as much charge and therefore will not last as long when you go to use it.  If you leave a battery unused for a length of time the charge will leak out and will not have as much charge in it when you go to use it.  This is why the night before I go to use my tools I put the batteries on the charge for a quick charge.

With these limitations why are they so prolific?  Well, it is because those metals were cheap to get.  The alternate battery is the Lithium-ion battery.  It uses Lithium with a combination of various other metals to make the battery.  The Lithium battery lasts longer, does not develop a memory and does not lose as much charge over a given time, but it also costs more.  Over time they are becoming more popular with the cordless tools and I would bet that they will soon become standard if they are already not so.
If you like what you have read, please subscribe to the blog, or follow me on twitter at @bjshideler. Also, don't be afraid to share this with your friends on your favorite social media sites.

M is for Makita


M is for Makita

Well I thought that I could do another review for this letter.  On the construction sites that I work on Makita is the favourite among them.  They generally tend to last and are well built.  We have several circular saws (5007) and they definitely stand up to the rigors of construction. 


Last year I got a Makita LS1017L 10-Inch Dual Slide Compound Miter Saw with Laser on it from the orange store.  I am pretty sure this is equivalent to the LS1016L south of the border.  It was on sale and came with a stand.  I have been very impressed by it and use it for the various projects that I undertake with wood projects. 

Some of the critiques that I have of it are the laser.  To me a laser is fairly gimmicky, it is aligned to cut with the center of the blade, which is good I guess if you want to split a piece of lumber in half, but I was taught that you measure to the edge of the blade so that the piece you cut is exactly the measurement that you want.

The little wings that come out to support material are not long enough to support any dimensional lumber.  And the stand that I got that came with it is just a stand for the saw with no material supports.  I am pretty sure that it will work with other Makita tools as there are several different holes in it that do not go into the saw.  The stand is easy to set up, but there is no support for long pieces.  So I need to make something so that I can cut up some dimensional lumber easier.

Overall this is a very capable saw and would recommend it to anyone that needed or let’s face it, just plain wants it.  If you like what you have read, please subscribe to the blog, or follow me on twitter at @bjshideler. Also, don't be afraid to share this with your friends on your favorite social media sites.


Friday, April 13, 2012

L is for Leather

L is for Leather

When I told my wife that today’s topic was leather, she smiled and said that either today will be really exciting or a really boring topic.   I said that this was a family rated blog.  About twenty years ago my Dad got a basic leather kit from Tandy Leather for Christmas.  It was really cool; it had a swivel knife, half dozen stamps to make the various patterns, and some starter projects.  My dad made a wallet and a belt out of the projects, and after he had made one I wanted to make one too.  There was still a billfold project left to make so I got to make that one.  The carving and stamping were not perfect but I learned a few things.  Now a kid does not have much use for a wallet, but once I was 14 I carried that wallet with me every day as I had my learner’s permit with me in case I was with my dad and I could drive somewhere.  I have carried it with me pretty much every day since then.  I still have it but the liner is starting to tear away from the outer and it is time to make a new one, as I have never found a commercial wallet that I really like. 

A few years ago now I got a basic leather kit for Christmas, so I have no excuse for not sitting down and carving out a new wallet.  I also picked up a pattern and a blank to make a belt, as my belt that I have right now is starting to wear out.  I have had it for about 7 years.  Now is the time to buckle down and quit making excuses and make some leather projects.  I am a little hesitant as this will be more of an artistic endeavour than some of my other projects and I have not yet mustered up the creative courage to embark.  This is probably partly due to my wife and her family that are very artistic and I know that I cannot compete in their world.  I just need to get over it I guess.

Well anyways, if you have worked with leather, share some of your projects or tips and tricks that we all may learn.  If you like what you have read, please subscribe to the blog, or follow me on twitter at @bjshideler. Also, don't be afraid to share this with your friends on your favorite social media sites.

Thursday, April 12, 2012

K is for Knife

K is for Knife

I really enjoy knives. I have several knives and there are some more that I would like to add to my collection.  Typically I carry three blades with me on any given day.  I have a folding EAB (exchange a blade) knife from Stanley, which gets used for all sorts of stuff at work.  I carry a folding lock blade knife that I got really cheap at co-op an number of years ago, I also carry an original Leatherman that has a really sharp knife that barely gets used.  Being in a project management position it is really funny to see the looks on the faces of my tradesmen when they are looking for a knife and I pull one out of my pocket and hand it to them.  Well, they are sort of surprised, but because I interact with them and talk to them they know that I am well grounded in the project. 

I have had a knife since I was very young.  My neighbours, who were migrant workers from Mexico, gave me my first knife when I was about 6.  It was a little folding knife that had a colourful handle.  I really loved it, I brought it to school for show and tell and I got in trouble for that, I never thought that it would be a bad thing to bring.  I have had a few more knives over the years. 

During high school I would have my buck knife in my pocket because I would feed cows in the morning, or I would have a little disposable box cutter knife as I would be going off to work at the hardware store after school.  Being from a rural community in my mind it was not that abnormal to carry a knife around with you at school.  During my summers I always had my Leatherman on my belt.  It was surprising how frequently in my day that I would use my knife for something. 

I do not think of a knife as a weapon, but rather as a tool.  Not while I attended school to my knowledge was there any altercation involving a knife either at school or in town.  Whenever I have a project I make sure that I have my knife with me, usually it is to open some sort of packaging, score a piece of material, or pry a small screw out of somewhere it has fallen.

Kids should be given knives to learn how to use safely.  I have a four year old and we are starting to let her use a butter knife at the table, slowly that will turn into a steak knife,  it will then lead to cutting things in the kitchen, and using a knife to make shavings for a campfire.  I make sure my sharp knives are sharp as dull knife is really dangerous.  There are several people out on the internet that advocate teaching knife skills to kids.  And why not? As parents it is our job to mentor the next generation by teaching them skills for life, so why should we hinder them by not teaching things sooner rather than later.  Back in the 1800’s people learned these skills at a young age and were venturing out on their own in their late teens.  So if they are able to learn them so is the current generation.

Anyways, share in the comments on how you teach kids to use a knife safely, as I am always looking for tips and tricks.  If you like what you have read, please subscribe to the blog, or follow me on twitter at @bjshideler.  Also, don't be afraid to share this with your friends on your favorite social media sites.

Wednesday, April 11, 2012

J is for Joining


J is for Joining

Well there are many ways to join two materials together.  I am most familiar with the ways to join wood together as this is what I have the most experience in.  I like my joints to be rigid and supported. 

To join wood together there are many ways in which you can join wood together.  The first is the typical mechanical fasteners which come in quite handy.  This can be further broken down into either nails or screws.  There are many kind of nails that I won’t go into here, mostly because I do not know them all, but I use either straight nails or spiral nails.  Straight nails are typically for temporary work as they are easier to pull out while spiral nails will hold into the material for a long time, and the material will likely get damaged if the nails need to be removed.  I don’t use nails that frequently as I am not a good shot with the hammer and I do not want to mar the surface of the wood, but since I got my air nailer last year I am more inclined to use them on projects where I have lots of things to put together, which I will use when I start work on my basement. 

I use screws a lot as they are not hard physically as with the repetitive motion of the hammer, and are quite strong.  I have learned to be careful when screwing into pressboard as the sawdust tends to strip out.

With either of these I like to use a cleat or something underneath the horizontal piece like a shelf to help support it.  It is a little bit my preference as there are shelves built on my construction site with just plywood and nails that hold a lot of tools and supplies with no cleat that hold up quite well. 

Moving on to joinery which is basically cabinet making style woodwork, which is what I enjoy as I did this in high school.  Because you do not want to see the heads of the nails or screws it is typical to cut a groove into the wood known as a dado or a rabbet if it is on the edge and then the piece is fit into the groove and carpenter’s glue is used to hold the piece together.  This is a strong joint, but not as strong as a mechanical fastener over time if the pieces get moved around a lot.  To make a dado joint you need either a dado blade for a table saw or a dado bit for a router.  I have only ever used the dado blades at school, but due to my limited space I will be acquiring some bits to use with a router so that I can build some of the cabinetry here at the house. 

There are other types of joints for wood and lots of ways to join other types of materials, but I am not as familiar with them.  What is your favourite way to join material?  Discuss down in the comments section.

If you like what you have read, please subscribe to the blog, or follow me on twitter at @bjshideler.  Also, don't be afraid to share this with your friends on your favorite social media sites.

Tuesday, April 10, 2012

I is for Ideas

I is for Ideas

Where do I get the ideas for my projects?  What is the inspiration for work?  Where do I get the information that I need to complete work?

For starters, you may have guessed that I have a lot of hobbies and interests, also I am homeowner, and I like to get out in the outdoors.  I am also frugal, not as much as my wife, but I do not like to spend money on things that I can do myself.  I guess that makes me independent. So necessity dictates a lot of the projects that I do.  I hate make work projects, so there has to be a benefit for me to spend the time and effort into working on the project.

I have not had a lot of artistic projects or projects with artistic elements in them yet, but there are some wood working projects that I would like to do that have some more aesthetic elements in them.  My inspiration for things is as varied as my hobbies, but I have difficulty to create them as my artisan skills are limited.  I enjoy religious symbols from many religions, medieval Europe, feudal Japan, Spanish design, electronics and futuristic modernism, so it all depends on what I want the space to become. 

I also gather information from a variety of sources.  This goes back to some of the other posts that I have published so far.  I tap into the resources of the communities that I am apart of.  Working in construction I deal with a lot of tradesman and I am in a position to be able to talk with them and ask them questions on how to complete certain work.  I also will search on the internet for answers and how to do it, and look on YouTube for the answers.  There are lots of forums out there on every topic, from woodworking to home metal shops.  Depending on how focused you are and how much you want to be involved in their communities then you will be able to get better answers out of people.  This is because they want to invest in other people in their community not just transients that are passing through their digital town.

The ability to do anything you want is with you, the information that you want is out there.  It is just needs to be sought after and asked for.  Please join my community as I go through some of my projects that we both may learn together by subscribing to my blog or following me on twitter at @bjshideler.  Also, don't be afraid to share this with your friends on your favorite social media sites so that we can cast the net out to those that are also interested.

Monday, April 9, 2012

H is for Hands

Well with any project at the home level I am typically using my hands to complete the project.  I try to wear gloves to protect them, but that is not always possible.  Protecting your hands is important and also the most likely location for an injury.  At our year end safety meeting when you combined a couple of the different factors hand injuries accounted for nearly half of all injuries that occurred. 

I know that whenever I work on anything I always scrape up my hand or arms.  For example, I owe you a post on the washing machine repair that I attempted, but during that time I was removing the shroud around the outside of the washing machine and since it is made of thin sheet metal I cut my hands a couple of times trying to wrangle it.  The other most common time I bang up my hands is when I am working on vehicles and I am using my socket set on tough bolts and/or in tight places.  I end up freeing the bolt or the wrench slipping off the bolt and my hand hitting something.  Well I guess I need to follow the advice I give to my 4 year old and just be more careful as I am working.  Well, until tomorrow, keep those hands safe.

If you like what you have read, please subscribe to the blog, or follow me on twitter at @bjshidelerAlso, don't be afraid to share this with your friends on your favorite social media sites.