Friday, June 15, 2012

Propane Regulator

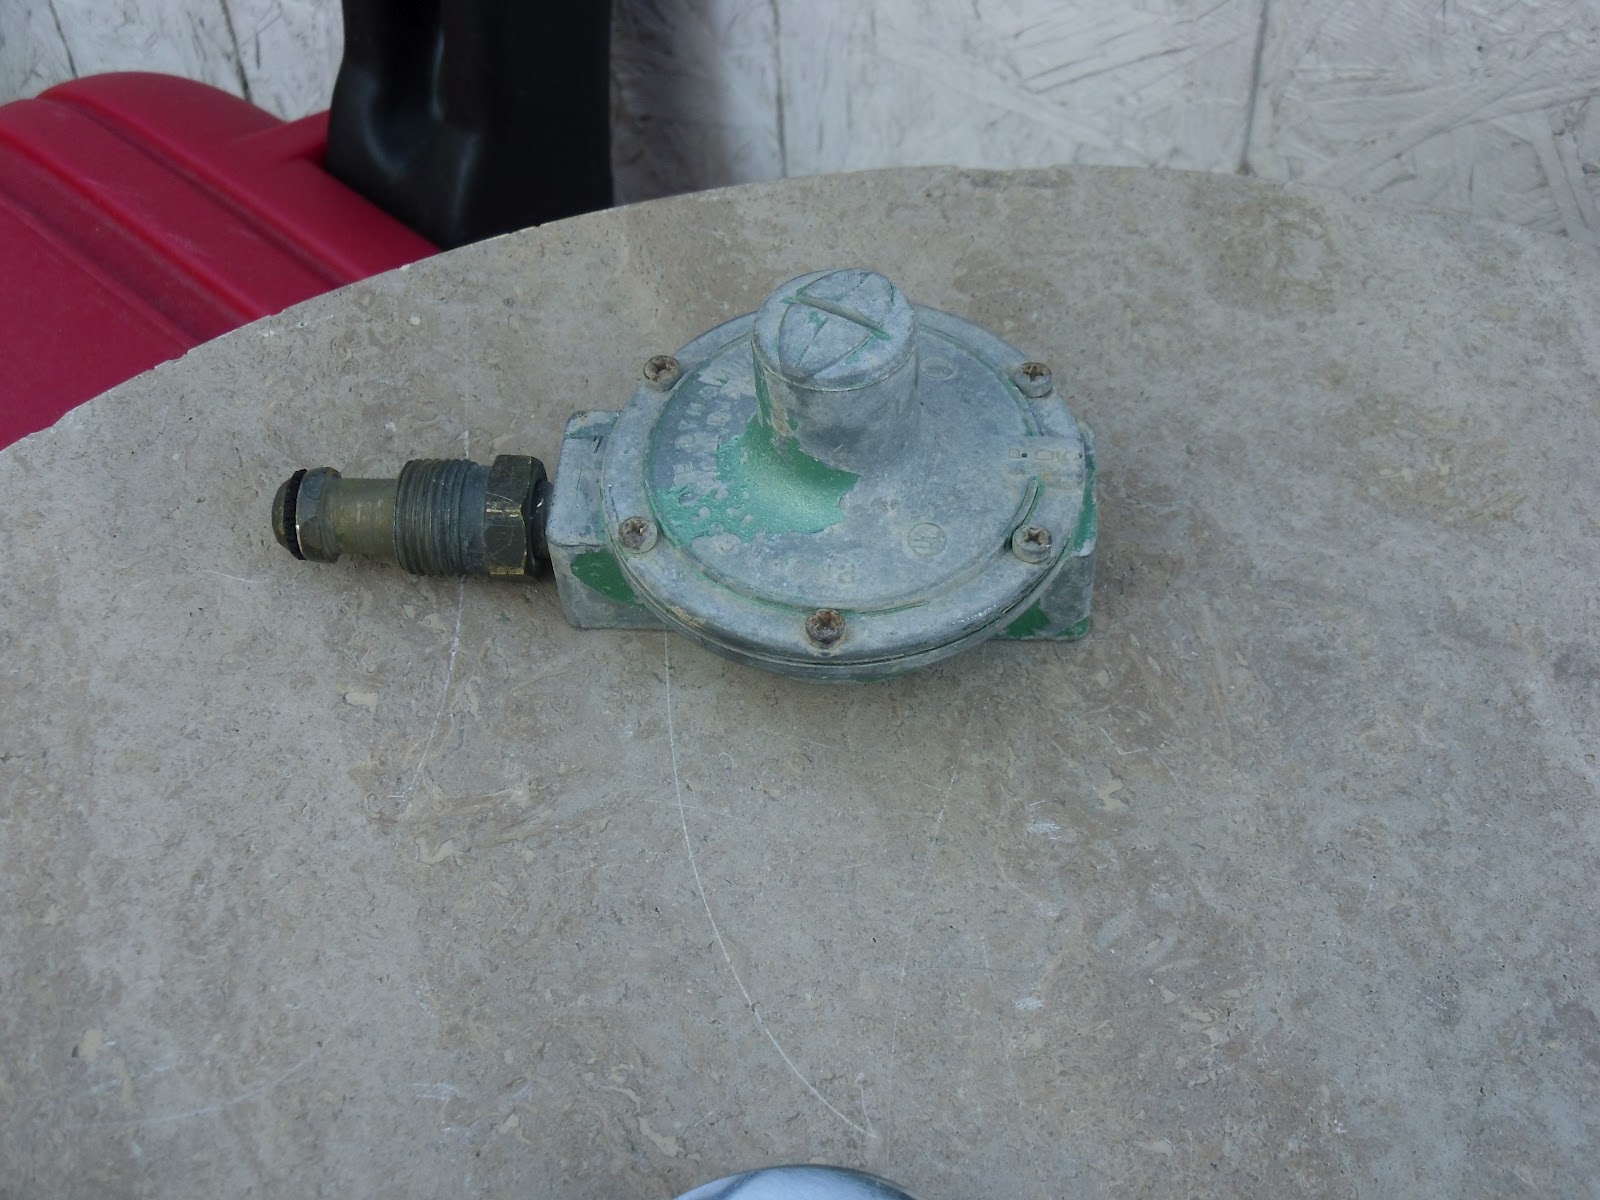
Now is the time of year where I start to do some trailer work.  When I have posted on my blog before about about work that I have done on my trailer, it has been popular.  I felt that I was not getting enough flow out of my propane system, especially on the propane light and knowing that the previous owner never used the propane system I figured that something was plugged in the system.  After a quick search on the Internet most people blame the regulator.  It is very possible that the regulator was clogged or damaged as I am sure that it had travelled a few miles without being plugged into a tank, and then being stored that way too, not to mention that the trailer is from the 70's so it is probably getting near the end of its useful life.  I decided that I would replace the regulator, and while I was at it upgrade the end of the hose to the new style so that I did not need to bring a crescent wrench down to the trailer when I wanted to change propane tanks. 

I know very little about gas fitting, other than standard plumbing rules.  I know that they use a different type of Teflon tape than with water.  The first thing I did was remove the old regulator to make sure that I got the right one from the store.  You could remove the nozzle too, but I wanted to change the style and I was not sure of the condition it either.  You cannot see it here, but the O-ring is pretty rough.


I put the old hose that connects to the steel lines on the new regulator.  Here you can also the new nozzle hose and some of the tools I used to get things apart and back together.  I would recommend a bench vise if you have access to one.


I taped all of the connections and made sure that they were very tight.  I reconnected the flex line to the steel lines.  Even though they are rusty they appear to be fairly strong and intact.


Once everything was connected I cracked open the propane tank and checked all of my connections for leaks.  I did not detect any leaks.  It was time for phase 2 of the testing.


I went inside and ran the propane on the stove, and I think the flow is better as I did not do a control test before I removed the regulator to see the flow.  When we bought the trailer there was an old propane light fixture, but the globe was damaged and I did not know what kind of mantle would go onto the light.  So I removed the light fixture and put a brass nipple and elbow and then a Primus fitting (the male fitting on a disposable propane bottle, or 1" x 20 TPI Male fitting) so that I could screw my camp light onto it.  When I put the light on I get a little bit of propane out of the light but there is still not enough flow to the light for it to burn.  I am going to have to experiment a little to find out what is regulating the flow down so that there is not enough propane.  


If you have any thoughts on this or your own propane stories, please share in the comments section.


Tuesday, June 12, 2012

Oil Change

From everyone that I have ever talked to about car maintenance an oil change is by far voted the most important thing to do.  Oil is very crucial to the operation of the engine, it lubricates the parts, helps transfer the heat from the pistons out to the block and the coolant system, maintains a pressure in the system, and helps flush out any grunge that develops from the combustion cycle.  This is the primary reason why the oil filter and oil is changed, also because of the extreme temperatures the oil breaks down and it will not be able to maintain the engine pressure.  You may notice that towards the end of the oil life cycle when you start up your vehicle the low pressure light stays on for a little bit longer than it normally does, this is why.  There is a lot of debate on whether to use regular oil or synthetic oil.  Sure, synthetic oil is really good for you engine, but if you cannot afford it then regular oil will be fine.  It is more important to change your oil frequently.  The maximum distance should be the one recommended in your owners manual.  They same debate occurs with brand of oil filters, the answer is the same, it does not matter.  Oil changes are very easy to do, and the lube shops charge way to much for what they do.  Instead of synthetic oil I use a Lucas Oil additive to replace a litre of oil for it.  This a fantastic product that I believe works to help both old and new engines.

Due to my recent work on the PT cruiser I was a little leery about changing the oil on it as I was afraid that the filter was hidden is some dark crevice of the engine compartment.  After I got the car up on the ramps and crawled underneath I was pleasantly surprised that the oil filter was easy to reach and that the drain plug was right beside it and easy to reach.  I have been changing the oil in cars for a lot of years, but it has been a few years due to the lack of a location and the time to change the oil.  With both vehicles to do now it makes more sense economically.

I also changed the oil in my 2001 PT Cruiser.  The lube shops charge an extra $10 for the privilege of removing the bottom skid plate (shroud).  There was 4 bolts (a few have been lost), it is ridiculous that they charge for that.  Once I got the plate of it took me a moment to locate the drain plug as it was not located exactly on the bottom of the engine like most other engines.  It looks like a little remote drain plug location, which makes it really to drain the oil.  I think more vehicles should have it, especially now that I know what it is.

For those that haven't changed oil before here is the quick rundown of how I do it.

1.) Put the car on ramps and engage the parking break.
2.) Open the hood up and remove the oil filler cap.
3.) Put a drain pan underneath the drain plug and remove the drain plug.
4.) Remove the oil filter and drain into drain pan (may need a wrench).
5.) Put a little oil on the gasket ring of the new oil filter.  The used oil is fine.
6.) Install new oil filter.  Turn the oil filter 1/3 turn past the contact point.
7.) Reinstall the oil plug.
8.) Add oil (amount is in owner's manual).
9.) Reinstall the oil fill cap.
10.) Start car and check for leaks.

Here is a good reference from Amsoil that you can look up the fluid capacities needed.

This is the procedure that I learned when I was 13 and I have been doing it ever since.  Share some of your oil change stories in the comments below.


Monday, June 11, 2012

May Long Weekend

In multiple countries there is a long weekend towards the end of May.  Here in Canada it is Victoria Day to celebrate the Queen's Birthday.  This weekend is often heralded as the start of the summer season, with many that go camping or do chores around the house.  As the campgrounds tend to be a zoo and the possibility for snow is high in Alberta for that weekend we decide to stay home.  I had a very ambitious list of items to complete.

In the fall I did not have time to complete the grounding installation for the HF vertical that sits on top of my house.  There had already been one thunderstorm and another was in the forecast I figured it was time to get that item complete.  This was a simple installation I installed a ground pipe clamp to the bottom of the antenna below the counterpoise so that the grounding did not interact with the antenna.  I used #6 copper wire down to the ground where I had a ground plate waiting in hole that I had dug.  On my coax from the antenna I have a lightning protection on that too, so I ran a copper wire from that to the ground plate.  With everything connected I buried the plate back into the ground.  This should be sufficient for my set up.

We had some friends over for a BBQ, a fire and to sit in the hot tub.  In anticipation for the weekend I got the hot tub started on Wednesday and all had started out well.  On Friday evening I opened up the hot tub to see how things were going and I had a sensor error.  Our hot tub is a few years old and we replaced the sensors last year, so I was surprised to see the error.  I will comment more directly on how I fixed this on a future post.

I had recently acquired a dual fuel (propane/charcoal) BBQ grill.  I have never cooked with charcoal, so I want to develop that skill, so we had our inaugural cook of with that.  I learned a lot about placement of coals.  I had over cooked the meat this time, but I will do better next time.

We were running out of steam on Monday, but we got the lawn mowed and the garden bed prepared for seeds.

What did  you get up to over the May Long weekend?  Share your story below with everyone.

Tuesday, May 1, 2012

Working on the PT Cruiser

Well, a few weeks ago we picked up a 2001 PT cruiser from the auction.  I did not follow all of my auction rules as close as I usually do and I got bit a little on it.  There was some major work that we missed.  So with the typical minor work we figured we would do it ourselves. 

First up the battery was kind of weak. After removing it we discovered it was bulging on the sides, which is a good indicator that the plates are not where they are supposed to be.  To replace the battery is a little bit of struggle and an exercise in 3D tetris.  From looking at the air filter the battery is right in front of the air box under the air intake ducting.  On other vehicles that I have worked on the battery is held in with a strap that goes over top of the battery, well not in this instance.  For the life of me I could not figure out how to get this out on my own.  Well a quick trip in to the computer and a view on YouTube I discovered that you had to pull out the air box with a good yank to get at the anchor for the battery.  After this it was smooth sailing to get the battery replaced.

Next up was the rear brake light.  That was simple, just a torx screw and the light assembly comes out.  Just twist out the bulb and replace.  This was a 3157 bulb.

Now to the front driver side signal light.  Learning from my previous experience I did a quick search on YouTube to see how to change the bulb.  To access the bulb, one needs to turn the wheel in and from the wheel well there is an access hatch in the molding of the wheel well housing that needs to be pryed open to gain access to the rear of the front light assembly.  After some cajoling I gained access to the lights and it was a simple twist and change of the 3157NA bulb.

So the moral of the story to me is that if I am to do work on the PT cruiser is to either YouTube search my query before I start the work so that I can be prepared for what I need to do before I begin the job. 

Share in the comments section some of your questions or insights on working on a PT Cruiser. 

If you like what you have read, please subscribe to the blog, or follow me on twitter at @bjshideler. Also, share this post with your friends on your favorite social media sites.

An End to the April A to Z blogging challenge

Well, the month of April is over and so is the April A to Z blogging challenge.  It has been a whirlwind and I did not know if I was going to be able to keep up with daily posts and the busy demands of my young family.  I was able to get all the posts out on their appropriate day, though some were at the eleventh hour.  The biggest part of my success was that I was able to prepare with topics before the month.  I came up with all of the topics prior to the month  This helped when I sat down at the computer to write the post I already had a topic to write on.  I now have more posts in the month of April than in my previous months worth of work.  I did not necessarily cover just projects I was working on, but kept to the theme of my blog of DIY projects.

I am very grateful to all the people that came and read my posts.  I have had over 500 pageviews in the last month, which is not a lot by the big wigs standards, but it is pretty good for me where I may get at the most 50 pageviews in a month.  I am also grateful to those that left comments as I have emphasized a few times in the last month that community is the most important thing along with the discussion that ensues from that community.

I was only able to read a few of the blogs that were involved in the challenge, which if I were to participate again next year, I would endeavor to get out into that community and have some discussions.  Also, because I was pressed for time I never proof read any of my posts prior to getting them out.  I took the approach that quantity was the name of the game over quality, so the quality may have suffered a little.  Next time I would like to have a graphic for every post as it helps it stand out when I post to my social media outlets. 

Thanks again for all that have stopped by, especially those that subscribed or left comments. Leave some comments on your experience from the month of April A to Z blogging challenge.


If you like what you have read, please subscribe to the blog, or follow me on twitter at @bjshideler. Also, share this post with your friends on your favorite social media sites.

Monday, April 30, 2012

Z is for Zero


Z is for Zero

In discussion with some colleagues at work on today’s topic on zero they said that I should have a bit where the limit of the function tends to zero.  Being that I generally do not discuss calculus on the blog generally and that limits are not my favourite thing to talk about I will defer that topic for the time being.

A zero is an important concept in building something. It is also known as a datum.  This is the point in which to measure everything off of, and therefore all cuts and work are from it.  I typically have two types of measurement errors, the first is where I just make a mistake and the second is where I take a measurement off of another cut without double checking to make sure the measurement chain works out.  Sometimes it is as simple as I did not account for the width of the blade in the cut.  Other times I was just not careful in the math to work out the chain.

On lumber typically the most accurate sides to take measurements off of are mill cuts or the factory cuts.  They are usually identified either with some paint or they have writing on them.  You know that the cuts are parallel and perpendicular to the work so that your other cuts have a chance at being so too. 

When machining you will take your metal stock and make a zero by facing off the stock so that it is also flat, parallel and perpendicular to the work surface.  From this surface all of the measurements are worked off from there. 

I have made these mistakes on my personal projects and whenever I get a drawing that has a dimension that comes from nowhere I tend to ask a lot of questions about it, or try to work through the measurement chain to see if the measurement is correct.

Please share some of your measurement adventures in the comments section below.  

If you like what you have read, please subscribe to the blog, or follow me on twitter at @bjshideler. Also, share this post with your friends on your favorite social media sites.

Saturday, April 28, 2012

Y is for Yardwork


Y is for Yardwork

I have done a bit of yardwork during my growing up years.  I was mostly responsible for cutting the grass.  During a number of years we lived on a farm that had a lot of grass.  We had a ride-on lawn mower at it took me at least 3 hours to mow the grass every week.  From this I have developed a strong dislike for lawn mowing.  At our place here in the city we have a very small patch of grass and I have a rotary push mower and I can mow the lawn in about 20 minutes.

I would like to reduce the work on my lawn even further my getting a movable rabbit pen and grazing meat rabbits on my lawn.  My wife is currently against the idea, but I think there are a lot of benefits to this.  The first being obvious is that I do not have to mow any more, the second is that it is fertilized, the third is that it the grass is stimulated to grow my natural methods. 

We take a similar approach to what few garden beds we have.  If I am going to put in plants into those beds then I need to be able to harvest some produce from them.  One of the easiest things to grow is herbs, and fresh herbs are so good in food that I am a big fan, they also bring in beneficial insects that will either pollinate my other plants or insects that will eat the insects that want to harm my other plants.

One of the common complaints that I have heard about the region of Calgary Alberta is that the season is too short and that you cannot grow anything here.  While it is true that we are in a Zone 3 area the biggest problem that I have encountered is the soil.  The beds at our house are dead.  There is no organic matter or life in them at all.  Soil needs to be living, but through constant turning and addition of both fertilizers and herbicides we have managed to kill the soil.  I am endeavouring to bring my soil back to life, so that it can sustain me.

Share some of your insights into yardwork and gardening in the comments below.

If you like what you have read, please subscribe to the blog, or follow me on twitter at @bjshideler. Also, share this post with your friends on your favorite social media sites.