My wife's PT cruiser has needed the brakes done so it has been on the list. They have been scraping when she applied the brake, so it is time to change them. My neighbor was kind enough to allow me to once again use his garage to perform the maintenance and show me how to do it. This trip into the garage is only the front brakes, the rear ones will require a second trip in as there is only so much time in the evening to get the work done.
This was a fairly straight forward process. We jacked up the front of the car and chalked the rear wheels. We took the front wheels off. On the brake caliper there is a bolt to hold the caliper to the wheel hub. We undid that bolt and pulled the calliper off of the rotor. You don't want the caliper to hang by the brake hose if you are going to put it down so we tied them up. Also, sometimes you need to spend some time working on the rotor to get it off, so you need it up out of the way. Luckily for us the calipers just slid off. I popped the pads out of the caliper. They were pretty low, almost down to the metal. Because we had added brake fluid a few weeks ago we needed to get a clamp on the caliper piston to bring it back so that we could insert the new pads. The side closes to the piston is the side that had the metal tab on the side of the caliper. With the extra fluid in the reservoir when we compressed both calipers we had some overflow from the reservoir. Once the pads were in, we just reversed the process to get everything back to normal.
I hear there may be some surprises with the rear rotors, but we will have to find out. Also, my Pathfinder will need new pads this fall, but I hear the rotors are difficult to get off in a Pathfinder, so I need to leave some extra time for that job.
Anyways, after changing pads this is something that most people should be at least aware of how to do, and do it once. Please leave some of your tricks for doing brake work down in the comments section.
Wednesday, June 20, 2012
Friday, June 15, 2012
Hot tub sensor swap
As I mentioned on the May Long weekend post I had to change the sensors on the hot tub. I wanted to break this post out just so that people can find it in the future for those that are interested. I have a Polar Spa hot tub that is over 6 years old. The name plate is wore a little and the model and dates are no longer present. It is controlled by a Balboa M-series controller.
On the Friday of the May long weekend I opened up the hot tub to see a sensor error (code Sn). This means that there is an error between the Sensor A (the inflow sensor) and Sensor B (the outflow sensor). I called my hot tub guy up to find out what I could do about this. Kyle over at J&J Service Tech in Calgary is a fantastic guy and answers my questions whenever I have them. Kyle told me to shut the power off for 30mins to see if it would reset. After the alotted time was over I turned the power back on and I got a Sensor B error (code Sb). This code states that there is a malfunction with that sensor. With another quick chat with Kyle and I found out that he did not have any sensors left as it is a busy time of year for getting hot tubs operational. He suggested a few places that I try that I might find them. He told me the part that I was looking for was the M7 Sensor.
Armed with my knowledge I set out to find the sensors. After a quick google search and some waiting for stock checks I found some. I figured if I was going to change one I might as well change both. I drained the hot tub to below the heating tube. You do not need to completely drain the hot tub, just make sure the water line is below where you are working. I pulled the cover off of the controller and traced the lines from the sensors to their connection points on the board. The circuit diagram is printed on the inside of the controller cover, and I always double check what I am working on is what the diagram says it is.
Here are where the two sensors are located at.

Change the sensors was easy, just unthread and unplug them . Then thread in the new one and plug it in the correct spot on the board. I tucked the wires out of the way and put the cover back on. I refilled it and turned the power back on. It takes a minute for it to initialize then it indicated that it was operating correctly.
If you have any comments or questions please share below. You can also follow me on twitter at https://twitter.com/@bjshideler
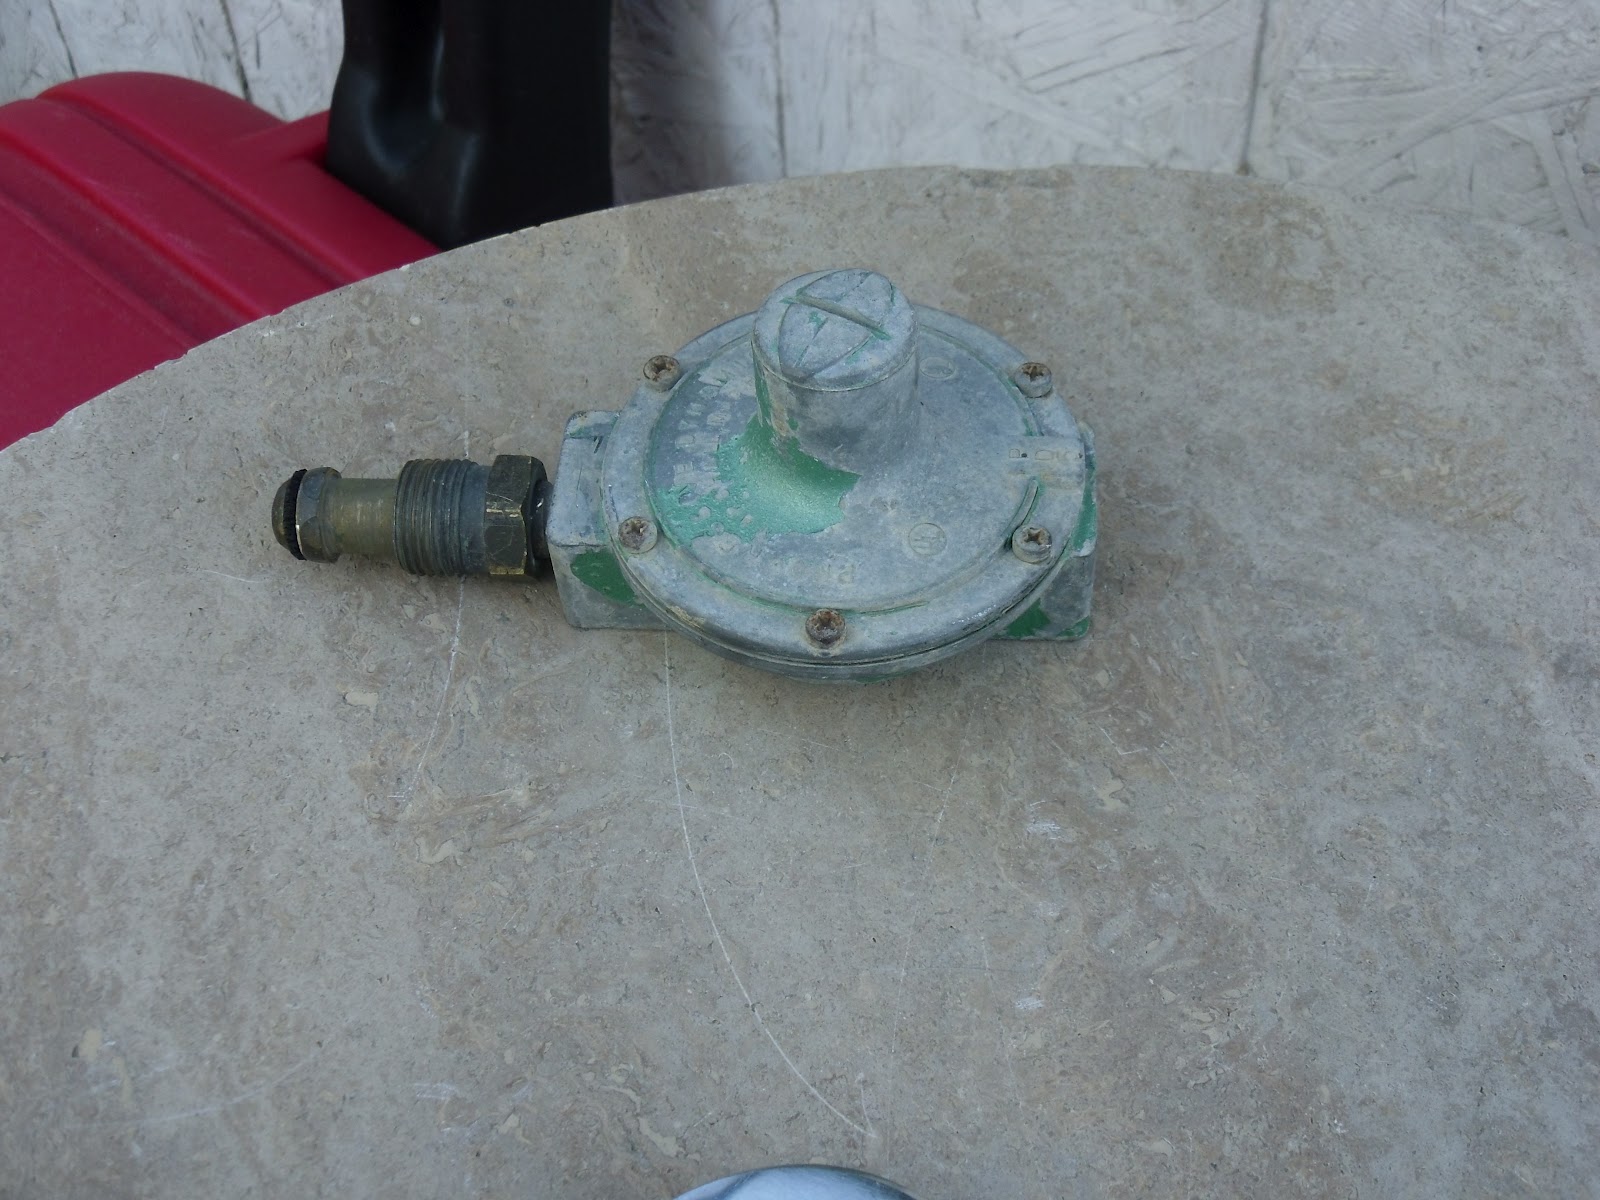
Propane Regulator
I know very little about gas fitting, other than standard plumbing rules. I know that they use a different type of Teflon tape than with water. The first thing I did was remove the old regulator to make sure that I got the right one from the store. You could remove the nozzle too, but I wanted to change the style and I was not sure of the condition it either. You cannot see it here, but the O-ring is pretty rough.
I put the old hose that connects to the steel lines on the new regulator. Here you can also the new nozzle hose and some of the tools I used to get things apart and back together. I would recommend a bench vise if you have access to one.


I taped all of the connections and made sure that they were very tight. I reconnected the flex line to the steel lines. Even though they are rusty they appear to be fairly strong and intact.

Once everything was connected I cracked open the propane tank and checked all of my connections for leaks. I did not detect any leaks. It was time for phase 2 of the testing.

I went inside and ran the propane on the stove, and I think the flow is better as I did not do a control test before I removed the regulator to see the flow. When we bought the trailer there was an old propane light fixture, but the globe was damaged and I did not know what kind of mantle would go onto the light. So I removed the light fixture and put a brass nipple and elbow and then a Primus fitting (the male fitting on a disposable propane bottle, or 1" x 20 TPI Male fitting) so that I could screw my camp light onto it. When I put the light on I get a little bit of propane out of the light but there is still not enough flow to the light for it to burn. I am going to have to experiment a little to find out what is regulating the flow down so that there is not enough propane.
If you have any thoughts on this or your own propane stories, please share in the comments section.
Tuesday, June 12, 2012
Oil Change
From everyone that I have ever talked to about car maintenance an oil change is by far voted the most important thing to do. Oil is very crucial to the operation of the engine, it lubricates the parts, helps transfer the heat from the pistons out to the block and the coolant system, maintains a pressure in the system, and helps flush out any grunge that develops from the combustion cycle. This is the primary reason why the oil filter and oil is changed, also because of the extreme temperatures the oil breaks down and it will not be able to maintain the engine pressure. You may notice that towards the end of the oil life cycle when you start up your vehicle the low pressure light stays on for a little bit longer than it normally does, this is why. There is a lot of debate on whether to use regular oil or synthetic oil. Sure, synthetic oil is really good for you engine, but if you cannot afford it then regular oil will be fine. It is more important to change your oil frequently. The maximum distance should be the one recommended in your owners manual. They same debate occurs with brand of oil filters, the answer is the same, it does not matter. Oil changes are very easy to do, and the lube shops charge way to much for what they do. Instead of synthetic oil I use a Lucas Oil additive to replace a litre of oil for it. This a fantastic product that I believe works to help both old and new engines.
Due to my recent work on the PT cruiser I was a little leery about changing the oil on it as I was afraid that the filter was hidden is some dark crevice of the engine compartment. After I got the car up on the ramps and crawled underneath I was pleasantly surprised that the oil filter was easy to reach and that the drain plug was right beside it and easy to reach. I have been changing the oil in cars for a lot of years, but it has been a few years due to the lack of a location and the time to change the oil. With both vehicles to do now it makes more sense economically.
I also changed the oil in my 2001 PT Cruiser. The lube shops charge an extra $10 for the privilege of removing the bottom skid plate (shroud). There was 4 bolts (a few have been lost), it is ridiculous that they charge for that. Once I got the plate of it took me a moment to locate the drain plug as it was not located exactly on the bottom of the engine like most other engines. It looks like a little remote drain plug location, which makes it really to drain the oil. I think more vehicles should have it, especially now that I know what it is.
For those that haven't changed oil before here is the quick rundown of how I do it.
1.) Put the car on ramps and engage the parking break.
2.) Open the hood up and remove the oil filler cap.
3.) Put a drain pan underneath the drain plug and remove the drain plug.
4.) Remove the oil filter and drain into drain pan (may need a wrench).
5.) Put a little oil on the gasket ring of the new oil filter. The used oil is fine.
6.) Install new oil filter. Turn the oil filter 1/3 turn past the contact point.
7.) Reinstall the oil plug.
8.) Add oil (amount is in owner's manual).
9.) Reinstall the oil fill cap.
10.) Start car and check for leaks.
Here is a good reference from Amsoil that you can look up the fluid capacities needed.
This is the procedure that I learned when I was 13 and I have been doing it ever since. Share some of your oil change stories in the comments below.
Monday, June 11, 2012
May Long Weekend
In multiple countries there is a long weekend towards the end of May. Here in Canada it is Victoria Day to celebrate the Queen's Birthday. This weekend is often heralded as the start of the summer season, with many that go camping or do chores around the house. As the campgrounds tend to be a zoo and the possibility for snow is high in Alberta for that weekend we decide to stay home. I had a very ambitious list of items to complete.
In the fall I did not have time to complete the grounding installation for the HF vertical that sits on top of my house. There had already been one thunderstorm and another was in the forecast I figured it was time to get that item complete. This was a simple installation I installed a ground pipe clamp to the bottom of the antenna below the counterpoise so that the grounding did not interact with the antenna. I used #6 copper wire down to the ground where I had a ground plate waiting in hole that I had dug. On my coax from the antenna I have a lightning protection on that too, so I ran a copper wire from that to the ground plate. With everything connected I buried the plate back into the ground. This should be sufficient for my set up.
We had some friends over for a BBQ, a fire and to sit in the hot tub. In anticipation for the weekend I got the hot tub started on Wednesday and all had started out well. On Friday evening I opened up the hot tub to see how things were going and I had a sensor error. Our hot tub is a few years old and we replaced the sensors last year, so I was surprised to see the error. I will comment more directly on how I fixed this on a future post.
I had recently acquired a dual fuel (propane/charcoal) BBQ grill. I have never cooked with charcoal, so I want to develop that skill, so we had our inaugural cook of with that. I learned a lot about placement of coals. I had over cooked the meat this time, but I will do better next time.
We were running out of steam on Monday, but we got the lawn mowed and the garden bed prepared for seeds.
What did you get up to over the May Long weekend? Share your story below with everyone.
Subscribe to:
Posts (Atom)